Recently I migrated motorcyclebaby.com from my old webhost to Dreamhost trying to follow Dreamhost’s instructions. It wasn’t exactly easy to follow.
I tried to keep other computer platforms in mind while writing this, but it’s next to impossible to include everything without writing a book. So, I keep it geared toward Mac users and Dreamhost and hope it’s still useful for others. This article is still painfully long.
A word about moving a WordPress site
There are two ways to do move a WordPress site:
- Build the site from scratch on the new server and import your content through the WordPress interface; or,
- Copy over the database and files from the old server into the new server and reconfigure.
The first method is needed if your moving from WordPress.com’s server onto a self-hosted site, or from some other corporate-controlled service like Web.com. Detailed instructions for this can be found at move.wordpress.com. The only thing these instructions don’t tell you how to do is transfer an edited theme or theme-child. For this you will need FTP or secure shell access to the old host in order to copy the theme-child’s files. But if you’re able to access the old host’s files and their database, you can also use method two.
If you want a new look to your site, going with the first method is easier, since you probably won’t need the theme files. But if you want to replicate the old site, the second method is the way to go. And that’s what I’m detailing here with special attention to using Dreamhost, my favorite webhost. This article might as well be called:
How to Replicate your WordPress Site onto Dreamhost with a Unix-based Computer, such as Mac
There are multiple ways to replicate a website. While moving my site using the same domain name, I tried to go via the path of least resistance and needed to refer to multiple sources. The following compilation of those sources requires:
- A hosting account on the new, destination server
- Access to your website’s database via secure shell (SSH) on a command line program like Terminal, or phpMyAdmin with username and password. Command line use is imperative for importing on Dreamhost if your database backup is larger than 64MB.
- Access to your website’s files via SSH, FTP, or other file management interface
- One-click installation of WordPress on the destination server
Hosting companies like GoDaddy make it easy to reach their database servers or turn on SSH access through easy-to-use interfaces or dashboards, such as cPanel or Plesk. Check the interface for links and buttons labeled with any of the keywords used in this post. On Dreamhost, FTP (file transfer protocol) can be accessed on the Domains panel, and phpMyAdmin (the MySQL database interface of popular choice) on the MySQL Databases panel under Goodies; both require usernames and passwords, which will be different between the webserver and database.
If you’re using a host other than Dreamhost, you can probably get away with using only that host’s control interface. Hopefully it’s intuitive, because this article talks about using command line.
A Note about One-Click Installs and Legacy WordPress Versions
If one-click install of WordPress is either unavailable on your new webserver or your theme is old and incompatible with WordPress’s latest release, you will have to manually install the older version. In such cases, you can go to WordPress’s release archive, find the version that’s compatible with your theme, download it, and then unzip/upload it to the server. For BASH (Bourne Again Shell) users, there are instructions here that don’t involve downloading and uploading. Without shell use, follow WordPress’s instructions to create a database and update the WP-config file. Note that using old versions of WordPress might be insecure to hackers and worms.
For themes that are compatible with the latest version of WordPress, continue below for method two for migrating a WordPress site.
Step One: Back up your database content in SQL format
When you back up content, you need to store that content somewhere you can access. Your computer is a good location, since you’re going to need it to restore your content on the new server.
To make sure your site is replicated exactly the way it appears on the old server, export your content in SQL format. You can export an xml version from the WP interface, but doing so does not always return your content the way you left it since the structure of your data might change in the conversion process. To export your content you can:
- Use phpMyAdmin or other database interface to make a .sql backup, or
- Use SSH to export the file
To use phpMyAdmin, after logging in, make sure you are in the correct database. The left column uncollapsed should show the tables of WordPress, which by default has the prefix “wp”. See the image below (Figure 1).
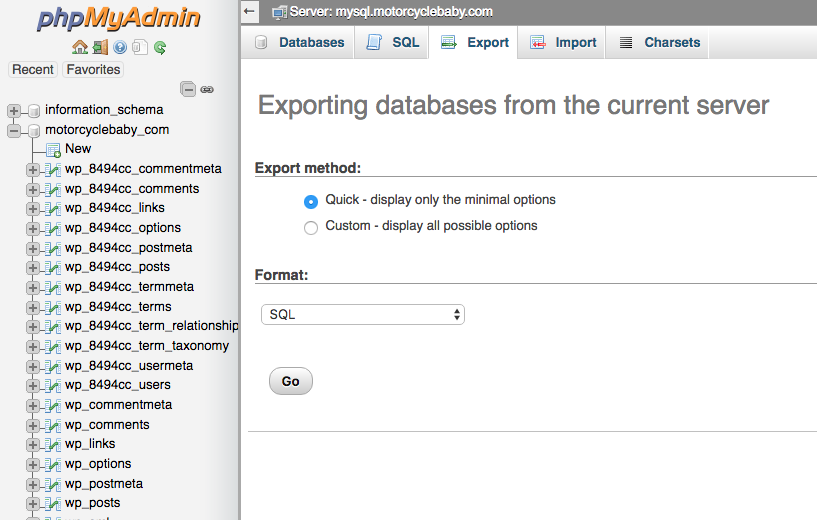
Figure 1. The export page of phpMyAdmin.
You’re not doing anything special with these tables, so just use the Quick export method and make sure the format is SQL. You will be prompted to give your export a name and choose a location to save it. If you want to use SSH later on, save the file in an easy-to-navigate location, like Desktop.
To export on command line:
- Log in to the old server with
ssh username@old.host - Backup using
mysqldump -p -h hostname -u username databasename > backup.sql and enter the old database password - Exit the server by typing
exit and enter - Copy the file from the remote server to your computer with
scp username@old.host:filepath/backup.sql ~/Desktop
Step Two: Update your current site to the latest version of WordPress, or the version used by the new webhost
On the WordPress dashboard, on the Updates page, check to see if your version is the latest. If not, the Dashboard will tell you that a newer version is available. It will also tell you to back up your content, which you have already done if you followed step one. If your backup is saved in an accessible location, go ahead and update WordPress.
Hopefully, the new installation won’t require an update to the database. WordPress will alert you and provide a link if an update is required. If so, update the database too to make sure everything works. Worst case scenario, at least your content is backed up. (Note: when a database is updated in this case, it means the software used to operate the database engine are updated. Nothing should happen to your content.)
Check your site to make sure everything looks as expected. You might want to check with the theme developer to see if there are any red flags with your theme or its parent. If it looks good and seems to work well, move on to step three.
Step Three: Save your current WordPress files locally
If your theme has been edited, i.e., is the child of a theme, you will need a copy of those files. You will also need your favicon (the little icon in the title bar on your brower) if you have one, and any other customized files. To make sure you get everything, select all of the files in your domain’s folder on old server and compress it into a zip file. Do not select the main folder to compress but select the items inside the folder.
Download the zip archive to a place you can access later. If you need to use SSH later on and are a novice at it, save the file in an easy-to-navigate location. If you’re using a Mac, save the archive under your Home folder. Desktop is a handy place. I saved my files in a folder called Sites, which used to be there by default in older versions of Mac OS, when it was more common for users to test websites locally on their home computers. As of OS 10.12, the sites icon will still appear for a newly-created Sites directory.
Step Four: Set-up WordPress on the new server
Hopefully at this point you will already have your new webhost set up. If you’re new to this indie webhosting stuff, chances are you are using a shared server. (I tried to find a good article on “what is a shared server” and “how does shared hosting work,” but couldn’t find anything worth linking. I guess that can be another article.) Make sure you understand the file structure of your server space. As of the time of this writing, GoDaddy stores files under one hosting account under a single public_html file, its top level being the main domain’s web storage location and subdirectories being additional domains’ storage locations. Dreamhost files are organized based on the username associated with the domains under an account, which helps make domain management flexible and manageable. Though you’re going to need two domains for this migration if you’re using Dreamhost.
A note about using Dreamhost: Even if you are using a domain name on your old server, go ahead and add your domain to Dreamhost’s Manage Domains panel. All this does is create a directory for your files. It will not be visible to the public until you either create a mirror of it or point your domain via DNS to Dreamhost. Also add a second domain using Dreamhost’s dreamhosters.com. You can give it any subdomain name that isn’t already being used. I used motorcyclebaby.dreamhosters.com. This second domain will be used to access your files.
If you want to use Cloudflare, do not enable it at this time. I learned this the hard way. Enable it during Step Ten or you may run into DNS redirect problems.
Once your domain’s file location is created, navigate to the webhost’s software installation utility. This is where you use one-click installation. On Dreamhost, it’s under Goodies -> One-Click Installs. Click on the WordPress icon, choose your domain (but not the dreamhosters domain), have it automatically create a database, and click Install it for me now!. This should do three things:
- Install WordPress’s files within your domain’s folder
- Set up a MySQL database, accessible via phpMyAdmin or SSH
- Set up the WP-config.php file located in your domain’s folder with all the needed database information
If one-click install is not available on your new server, refer to the links in the paragraph above under the heading A Note about One-Click Installs and Legacy WordPress Versions.
When the installation is complete, your new webhost should contain WordPress files with ready-to-go configuration in your server chunk’s folder and a new database with WordPress tables like those in Figure 1. Unfortunately, you won’t be able to look at the website yet.
At this point, nothing should work. Just kidding. At this point, WordPress on the new server will be ready for someone to log in and write a first post. But you’re not going to do that. Instead, go to step five.
Step Five: Import your database content
If the site you are migrating is your first website on a Dreamhost server, you need that second domain mentioned in paragraph two in Step Four in order to log in via SSH or access the WordPress files via FTP. You won’t be able to access your new server space with username@yourdomain.com since the domain is still pointing to your old webhost. More on this later. Next:
- Retrieve the new database’s username and password set up by the installation script. On Dreamhost, you can find these under Goodies -> MySQL Databases. In the middle of the page, under “Database(s) on this server”, click on the username associated with your new database to retrieve the password.
- Also make a note of the database name Dreamhost created. You will need this.
If your database backup is larger than 64MB, you need to use SSH to import your content onto Dreamhost’s database. On other webhosts you might be able to use phpMyAdmin. GoDaddy’s phpMyAdmin can import files up to 1.073GB; just log in to it and choose Import.
Next, for Dreamhost, you will need that second domain. Make sure the user for your two domains is the same. Dreamhost organizes your files according to User, and you will be able to access files for both domains with the same user. This is how to get around having your domain name on Dreamhost and uploading files for it even though DNS points your domain to your old server.
The following is how to import via SSH from a Mac and Ubuntu (sorry, I’m Windows-shell illiterate). Open Terminal, under Applications/Utilities. Then:
- Navigate to the location where your backup is saved. If you’ve followed my suggestion at the end of step one, on a new line enter
cd ~/Desktop. The tilda (~) is the notation for Home on a Mac and on Ubuntu - Secure copy (scp) the SQL file to the new server’s database. Enter
scp yourbackup.sql username@yourdomain.dreamhosters.com:.. The “:.” indicates location and the dot means here. The password is the same as your webserver password, but not the database. If the copying command is successful, a new blank line with $ will appear with no error messages before it. - Access the webhost’s server with secure shell using
ssh username@yourdomain.dreamhosters.com and use the same password as the previous step - And here’s the importing step… assuming your command line is where you uploaded the SQL file, enter
mysql -h mysql.yourdomain.com -u username -ppassword yourdbname < databasefile.sql where mysql.yourdomain.com is the server name of your database. Dreamhost automatically creates the database with mysql as a prefix. Note that here you can use your domain name instead of dreamhosters, because at this point your command line is operating through the Dreamhost server. Also note that there is no space between -p and the database password. Ask Oracle why. IDK. Again, a blank line with $ and no error messages indicates success.
Step Six: Fix the WP-config.php file on the new server and save it
In an ideal scenario, the new WordPress installation would automatically connect to the your content. However, switching webhosts doesn’t naturally present ideals. Chances are, unless you had a hand in its configuration, each database has tables with a designated prefix attached to their names. In Figure 1 (under Step One), the first several tables listed on the left have “wp_8494cc” as the prefix. This was auto-generated by Dreamhost’s one-click installation scripts. Below those tables are ones with prefix “wp_” which incidentally was how I had set it up on the old server. (This pared down prefix is not recommended if you plan to use one database for multiple WordPress sites.) If your old server automatically created your database, it too will probably have some extra characters in the tables’ prefix. These prefixes need to be matched.
- On your computer, unzip, or uncompress, the WordPress archive you downloaded in Step Three and look for the wp-config.php file. Mac will create a new folder and place the contents of the archive there. On Linux, designate a folder with
-d as in unzip yourarchive.zip -d foldername/. - Open wp-config.php with a text editor such as TextEdit and locate the line containing
$table_prefix =. Make a note of the value. It should be or start with wp_.
For the next fixing steps, you can use your new host’s file management interface if you want. On Dreamhost, log in to WebFTP as yourdomain.dreamhosters.com. Find wp-config.php and open it with Source Editor. Otherwise, on your command line:
- Navigate to the folder where the WordPress files are located on your new server. On Dreamhost, it will be in a directory with your domain name. If you’re not sure, enter
ls for list to view the names of the files available. If you see a bunch of filenames with wp, you are in the right place. Otherwise if you see your domain name in the list, enter cd yourdomain.com. Hopefully, the WordPress files will be there. (Try ls again.) - If you see wp files, open the wp-config.php file using nano. On Dreamhost, simply enter
nano wp-config.php. On other webhosts, you might need to add sudo as in sudo nano wp-config.php for which you need your server admin password. Nano is a text editing program recommended for newer command line users. - Once in editing mode, use the arrow keys to navigate down the file until you find: $table_prefix near the bottom. You can also use CTL + W and search for “table_prefix”.
- Replace the value after = with the value in your original WordPress configuration file, found in the second bullet of this step. (If the values are the same, then the site should already be working.) You will need to use the arrow and delete keys to edit it.
- Use keys Control + X to exit and type Y for Yes to save changes.
You will need to preserve this configuration for the new server. So that this file does not get overwritten in Step Eight, type exit and hit enter to leave the server and use the command line locally. On a Mac, the line will contain your computer Home name and maybe the name of your hard drive. If your command line is not already in a good location to save the file, navigate to a good location, like cd ~/Desktop. Then enter scp username@your.newserver.domain:domainfolder/wp-config.php . .
Step Seven: Prepare the saved WordPress files
For the sake of simplicity, let’s prepare the entire WordPress folder so that you can copy the whole thing and put it on the new server. You will need to use the files that you uncompressed in Step Six.
- Overwrite the old wp-config.php file that you unzipped in Step Six with the one you downloaded in the last paragraph of the previous step. To do this on command line type
cp ~/Desktop/wp-config.php ~/yourUnzippedWPdirectory/wp-config.php. - Select all of the files in your unzipped local WordPress folder including the newly-replaced configuration file. Do not select the folder containing the files, but select the actual files and sub-directories. Otherwise, Step Eight won’t work properly.
- Compress the selection and make sure it’s in an easy-to-locate directory. You can do this with command line. Use
cd ~/yourUnzippedWPdirectory to go where these files are and then use zip -r Archive.zip ~/Desktop to compress the files and save the archive on your Desktop. (I don’t actually use my Desktop for this stuff. I’m just trying to make these instructions easier to follow.)
Step Eight: Copy the WordPress files on the new server
Now let’s get the whole thing working.
- From command line, or Terminal, change directory (cd) to where your newly-archived set of WordPress files are located. If you need to go back a level, use
cd ../. Two dots means back one level. - Upload the archive to the new server using
scp Archive.zip username@your.newserver.domain:domainfolder. - Log on to the new server using
ssh username@yourdomain.com and enter your webhost’s password (not the same as your database password). - Change directory to your domain folder using
cd domainfolder/. You don’t really need the slash; it’s there to indicate that it is a directory and not a file. - Uncompress the archive using
unzip Archive.zip. Doing this will unpack all of your files. Make sure that you overwrite what is already there. If the server computer asks you if you want to overwrite All, type A for all.
If for some reason you only want to copy the files necessary for your site to look the same, on the new server overwrite the images folder, the favicon.ico and favicon.gif. The wp-config file should already have been updated in Step Six. Copy in your theme folder located in wp-content/themes.
Step Nine: Check for problems before going live
Unless you’ve used a domain that’s different from your original site, you can’t just visit the domain to check if the new installation works. Some webhosts provide a way to view the files, like provide a server address to which you add your site’s root directory or your username. But not Dreamhost. Dreamhost provides the ability to mirror your site and an article on how to do it. But these instructions don’t tell you how to mirror a WordPress site which involves changing wp-options entries and database URLs. I don’t think mirroring on Dreamhost is necessary. I tried it and eventually ran into WP problems. Instead, I updated my hosts file.
Edit your computer’s hosts file to view your site on the new server before changing DNS records. What this does is direct your computer to whatever IP address you list for the domain you are relocating. To get this to work with WordPress, there are a few steps:
- Temporarily change your new WordPress configuration so WordPress doesn’t point your browser to the old server. Using the source editor via WebFTP or SSH, edit wp-config.php adding
define('RELOCATE',true); before the comment line that says “That’s all, stop editing!” Since you are going to edit your computer’s hosts file and not your server’s hosts file, this is necessary. - Temporarily edit your hosts file. To do this on Terminal, make sure your command line is connected to your computer and enter
sudo nano /private/etc/hosts using your computer’s administrator password. Add three lines to the bottom: 111.111.111.111 yourdomain.com
111.111.111.111 www.yourdomain.com
222.222.222.222 mysql.yourdomain.com You can find the actual IP addresses on Dreamhost’s Manage Domain’s panel by clicking on DNS for your domain. These lines will need to be removed after you get to Step Ten. For now, go ahead and Control + X and type Y for Yes to save and exit. - Flush your DNS cache with
sudo killall -HUP mDNSResponder;sudo killall mDNSResponderHelper;sudo dscacheutil -flushcache. For flushing DNS in Mac OSs older than Sierra and Linux, check Dreamhost’s article.
After the above three steps are complete, visit your domain. Hopefully it will all work. Something that I did to make sure I was on the new server was go into phpMyAdmin and make changes to the content. I removed fake subscribers from the Users list, and then checked through the WordPress Dashboard on the Users panel to see if they were gone. But you can make any simple change and check it.
Step Ten: Go live
If everything looks good, go to your domain’s registrar and add custom DNS entries to your domain’s configuration. For Dreamhost, add:
ns1.dreamhost.com
ns2.dreamhost.com
ns3.dreamhost.com
Don’t forget to remove the RELOCATE line in your wp-config.php file, or else your site might end up in a redirect loop. Also remove the three lines added to your hosts file in Step Nine and flush your cache again. It might take several to 48 hours for the DNS changes to propogate.
Finishing up and adding SSL
Now is the time when you can activate CloudFlare, which helps your site respond faster, and SSL (Secure Sockets Layer), which can protect your password when you log in to WordPress but can also slow down connection. Oh well. Full instructions for this is another article, though maybe not as long, but here is a bucket list of requirements for activating these on Dreamhost:
- Make sure on your WordPress dashboard that you have www on your URLs for both your WordPress and Site addresses under Settings -> General. This can also be checked through phpMyAdmin under the table wp_options under column option_names with values “home” and “siteurl”. This is necessary for activating SSL on all of your WordPress installation and having it work with CloudFlare.
- Edit your .htaccess file located at the root level of your WordPress installation. The dot before the filename indicates that it’s a hidden file. From Terminal, in your WordPress directory on the webhost’s server, enter
ls -a to view all the files including hidden ones. Use nano .htaccess and add the following lines after </ifModule>: RewriteEngine On
RewriteCond %{HTTPS} !=on
RewriteRule ^(.*)$ https://%{HTTP_HOST}%(REQUEST_URI} [L,R=301] Control + x and save your changes. - Edit your wp-config.php file again. In the same place where you had added RELOCATE to view your new site in Step Nine, item one, add: define(‘FORCE_SSL’, true);
define(‘FORCE_SSL_ADMIN’,true); - Turn on SSL. On Dreamhost, this is done on the Manage Domains panel. Choose Let’s Encrypt, because CloudFlare won’t work with WordPress if you use a self-signed certificate. Let’s Encrypt provides a free company-backed certificate. You can also import a certificate or buy one from a verifiable vendor. Dreamhost offers Comodo-verified certificates.
- Add CloudFlare. If you don’t already have a CloudFlare account, you will be prompted to open one.
- Log in on CloudFlare.com, choose your domain, and click Crypto. In the SSL box, the default encryption level is “flexible”. Choose Full. Scroll down to where it says Always use HTTPS and turn it on. This is important because WordPress content appears in multiple ways and may link to multiple locations. These settings help keep it uniform.
One source said to change all instances of http:// to https:// in the WordPress database, but I’m not sure this is necessary. A source also said to add s to make https:// in wp_options through the dashboard. I did this but it didn’t stick. I don’t know what happened and at this point I don’t care. This took me two days to work through all of the problems that came up, which is why I wanted to write it all down.
There’s a good chance that there are still edits required to competely replicate the site from the old server. Differences include file paths in the database, which can be searched and replaced with MySQL, and available fonts. Motorcyclebaby.com still needs updating. It might mean using a different theme or editing the theme files to make it compatible with WordPress’s updates.
I hope this article helps and that using command line makes it seem less lengthy. Please give me feedback. I’m happy to make changes to improve it.
The sources are numerous to list, but here are links to some of them:
Dreamhost’s “How to manually migrate WordPress to DreamHost”
Another article on migrating WordPress
Dreamhost’s article on editing the hosts file
WordPress’s article, “Changing The Site URL”
StackOverflow.com; I don’t remember what I looked up, but it’s a good resource for problems not addressed here.
How to change URLs in a WordPress database